What is a Hip Opener? (part 1)
Considering how often they are requested, “hip openers” have to be one of the more desirable categories of postures offered at any yoga class, and for good reason. Any student of yoga wants more open hips as the benefits of increasing the mobility of the hip joints are numerous. Increased mobility of the hips can relieve hip, low back and knee pain, as well as improve leg strength, balance and pelvic floor function, to name just a few. More mobile hips are also essential for performing more advanced postures.
But common approaches to opening the hips taught in yoga classes frequently range from ineffective to downright injurious. Considering the fact that hip replacement surgery is becoming commonplace in the western world, the dubiousness of the “hip opening” often offered to yoga students is unfortunate to say the least. Especially when, as you’ll see here, a little knowledge and a bit of know how is enough to allow anyone who’s interested to increase the mobility of their hips safely and effectively.
So what is a safe and effective way of hip opening? It starts with seeing where our body is actually at and understanding where we want it to go and how to get it there. So first we need to look objectively at the range of motion our hips currently have. Next we need to learn to see what is a movement of the hip joint and what is a movement of some other part of the body. Finally, we need to learn ways of increasing our range of motion (ROM) that maintain the integrity of the hip joints and do not place inappropriate loads on the spine or the knee.
The hip joint has 6 different ranges of motion. These are flexion, extension, external rotation, internal rotation, adduction and abduction. Flexion involves the thigh bone or femur moving toward the front of the pelvis or the pelvis rotating toward the front of the femur. This is the ROM that is most crucial for doing a forward bend. Extension is the opposite of flexion. In hip extension the femur moves toward the back of the pelvis. Extension is the ROM used primarily in back bends, but it is also important for walking.
External and internal rotation are the femur rotating away from or toward the opposite leg respectively. Adduction and abduction are the femur moving laterally (as opposed to rotating) towards and away from the opposite leg respectively. Adduction also describes when the femur moves across the midline of the body and beyond the the opposite leg and hip. All of these ROM’s are important in both standing and seated postures.
Of all of the ROM’s of the hip I mentioned above, flexion is the movement our hips do most often. Flexion is the primary movement done in forward bends, but it’s also the hip motion we do every time we sit and we should but don’t necessarily do every time we reach forward to pick something up or use the sink or the toilet (we often bend the spine instead of the hip). Therefore improving our hip flexion will not only help our forward bends in yoga but also help us with the everyday activities that, when our hip ROM is limited, put constant stress on our knees and lower backs.
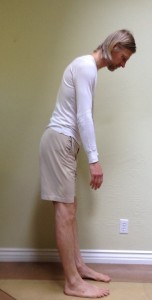
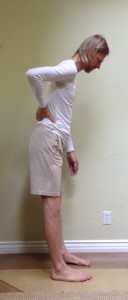
Let’s start by looking at how much hip flexion we have. Stand with your feet separated about 5-6 inches and parallel. If possible, stand profile to a mirror so that you can see the shape of your spine. If you tend to get lower back pain when bending forward, put a chair or stool in front of you so you can take some support from it. Next, move your hips back just a little, that is, just until you begin to perceive the pelvis tilting forward (see figure 1). Now look at the shape of your back in the mirror. The lower part of the spine or lumbar spine should be somewhat concave. If you don’t have a mirror, you can try feeling the shape of your spine with your finger tips(see figure 2). If the lumbar does not curve in but rather rounds out, lift your sit bones and your tailbone up away from your feet until you’ve restored the concave shape. This is hip flexion.
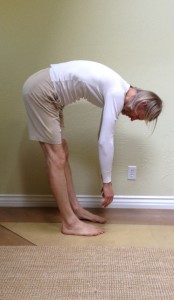
Once you have established a concave lumber position in this very modest forward bend, continue to move your hips back and lift your sit bones up to increase hip flexion. Still using the mirror or your finger tips, notice when your pelvis can no longer tilt forward and the shape of your lower back starts to change. When it does you have reached the end of your ROM of hip flexion and have begun flexing your lumbar spine instead (see Figure 3). If you do this enough it will eventually cause back pain and may compromise the integrity of the spinal joints. Conversely, if you can learn to maintain your lumbar curve more often it will help develop the ROM in your hips you need to do deep forward bends safely.
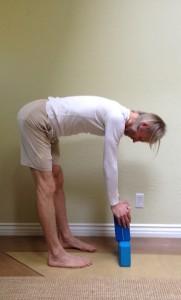
Now lift your trunk slightly back up until you have restored the concave lumbar position. To establish a marker, see how far your hands are from the floor. You might use yoga blocks, for example, to see how far you are. Are you one block? Two blocks? A block and a half? Get an objective measure you can use as a baseline you can refer to later and evaluate progress (See Figure 4). Then come up from your forward bend, preferably with your knees straight. If your back hurts coming up with the knees straight then bend your knees to come out. As you hip ROM improves and your legs get stronger you will gradually find it easier to come out of this forward bend without bending your knees. This is another measure you can use to monitor your progress.
To work on increasing your ROM of hip flexion, repeat the above but begin to hold the position for a period of time. Start with holding the fully hip flexed position with your still concave lumbar for 20-30 seconds. Repeat it 3-4 times. In time you’ll find you can increase your time in the posture and with increased time you’ll see progress. Your hip flexion with increase and your forward bends will improve!
Stay tuned! Next we’ll look at hip extension.


